Crispy Oven-Baked French Toast Sticks: The Ultimate Easy Breakfast Recipe
Imagine a breakfast that brings together the comforting warmth of homemade French toast with the irresistible convenience of a dippable, handheld treat. That's exactly what you get with these incredible **crispy oven-baked french toast sticks**. Gone are the days of standing over a hot stove, flipping individual slices of French toast. This ingenious recipe delivers golden-brown perfection, boasting a satisfying crunch on the outside and a delightfully soft, fluffy interior, all with minimal fuss and mess. Perfect for busy mornings, leisurely brunches, or even a fun "brinner" (breakfast for dinner), these homemade French toast sticks are destined to become a family favorite.
Whether you're craving a sweet start to your day or need a crowd-pleasing option for guests, these baked French toast sticks are the answer. They offer all the beloved flavors of classic French toast – warm cinnamon, a hint of nutmeg, and comforting vanilla – but in a format that's easier to prepare and even more fun to eat. Plus, because they’re baked in the oven rather than fried, you achieve that coveted crispy goodness with less oil and a simpler cleanup, making them a healthier and more convenient alternative.
Why Oven-Baked French Toast Sticks Are a Game-Changer
Switching from pan-frying to oven-baking for your French toast sticks isn't just a minor tweak; it's a revolutionary approach that enhances convenience, reduces mess, and often leads to a more consistent result. Here’s why this method is superior for your next breakfast creation:
- Effortless Batch Cooking: One of the biggest advantages of oven-baking is the ability to cook many sticks simultaneously. Instead of painstakingly frying a few pieces at a time, you can fill an entire baking sheet, freeing you up to prepare other elements of your meal or simply relax while breakfast bakes. This is especially invaluable when feeding a crowd or managing different wake-up times for family members and guests.
- Reduced Mess and Cleanup: Say goodbye to oil splatter and grease. Baking eliminates the need for excess oil in a skillet, which means less mess on your stovetop and fewer greasy pans to scrub afterward. Cleanup is often as simple as tossing a piece of parchment paper.
- Consistently Crispy Texture: The dry heat of the oven, particularly when combined with proper preparation, helps to draw out moisture, resulting in an exceptionally crispy exterior without being oily. This method often yields a more even crispness across all surfaces compared to pan-frying, where consistency can vary depending on heat distribution and flipping technique. For even more detailed guidance on achieving that perfect crispy exterior and fluffy interior, check out our tips for Get Perfect French Toast Sticks: Tips for Crispy, Fluffy Bites.
- Healthier Alternative: With significantly less oil needed for baking, these French toast sticks offer a lighter alternative to their pan-fried counterparts. You still get all the flavor and texture without the added fat, making them a guilt-free indulgence.
- Kid-Friendly Fun: There's something inherently appealing about finger foods, especially for kids. French toast sticks are perfectly sized for little hands to dip into syrup, fruit purees, or yogurt, turning breakfast into an interactive and enjoyable experience. Adults love them too!
Crafting the Perfect French Toast Stick: Ingredients and Technique
The magic of homemade **french toast sticks** lies in a few key ingredients and simple techniques. Getting these elements right ensures that golden, crispy exterior and tender, fluffy interior every single time.
The Foundation: Choosing the Right Bread
The bread choice is paramount. Forget thin, regular sandwich bread – it will absorb too much batter and turn out soggy. The secret to a sturdy yet tender French toast stick is using a thick-cut bread, ideally 1 to 1 ½ inches thick.
- Recommended Breads: Texas toast is an excellent pre-sliced option. Alternatively, a whole loaf of challah, brioche, or a sturdy white bread (like a country loaf) works beautifully. You can slice these yourself to the desired thickness. Stale bread (a day or two old) is actually ideal, as it holds its shape better and absorbs the custard without becoming mushy.
- Preparation: Once you have your thick slices, cut them into "sticks" – typically three or four per slice, depending on the size of your bread. Aim for uniform size for even baking.
The Custard: A Symphony of Flavors
The batter is where the flavor truly comes alive. It's a simple whisking process, but the balance of ingredients makes all the difference.
- Eggs: Large eggs are standard. If you only have small or medium, adjust accordingly, using about four to five small/medium eggs for every three large eggs called for in most recipes. They provide richness and help the batter adhere to the bread.
- Milk: Any milk will do, from 2% to whole milk. For a richer, creamier batter, consider using heavy cream or a half-and-half blend. If you're looking for dairy-free alternatives, almond, oat, or soy milk work well, though the final product might be slightly less thick and creamy.
- Sweetness & Spice: A blend of granulated sugar, warm cinnamon, and a pinch of nutmeg creates that classic French toast aroma. Don't forget a splash of vanilla extract for depth. A tiny pinch of salt can also help balance the sweetness and enhance the overall flavor profile.
- Technique: Whisk all batter ingredients thoroughly until well combined. Submerge each bread stick briefly – just long enough for it to soak up the custard without becoming saturated. Thick bread can handle a slightly longer soak, while thinner slices need only a quick dip.
The Baking Process: Achieving Crispy Perfection
Preheat your oven to a moderate-to-hot temperature (typically around 375-400°F or 190-200°C). Line a baking sheet with parchment paper to prevent sticking and for easy cleanup. Arrange the soaked bread sticks in a single layer, ensuring they don't touch each other, which allows air to circulate and promotes crispness. A light sprinkle of extra sugar or cinnamon sugar on top just before baking adds a beautiful caramelized crust. Bake for about 15-25 minutes, flipping halfway through, until golden brown and firm to the touch. Keep an eye on them towards the end, as ovens vary, and you want them perfectly toasted, not burnt.
Dipping, Topping, and Customizing Your French Toast Sticks
One of the best things about **french toast sticks** is their incredible versatility when it comes to serving. They're a blank canvas for all sorts of delicious accompaniments.
Irresistible Dipping Options:
While classic maple syrup is always a hit, don't limit yourself! Think outside the box for fun dipping experiences:
- Classic Syrups: Pure maple syrup, fruit-flavored syrups (strawberry, blueberry), or even a warm honey.
- Creamy & Rich Dips: Melted Nutella, warm chocolate sauce, dulce de leche, or a light yogurt dip.
- Fruity Fun: Homemade fruit preserves (raspberry, peach, apricot), a berry compote, or a fresh fruit puree.
- Unique Twists: A quick lemon curd, a dollop of whipped cream, or even a savory-sweet cream cheese glaze.
Delightful Topping Ideas:
Enhance the visual appeal and flavor with a sprinkle of toppings:
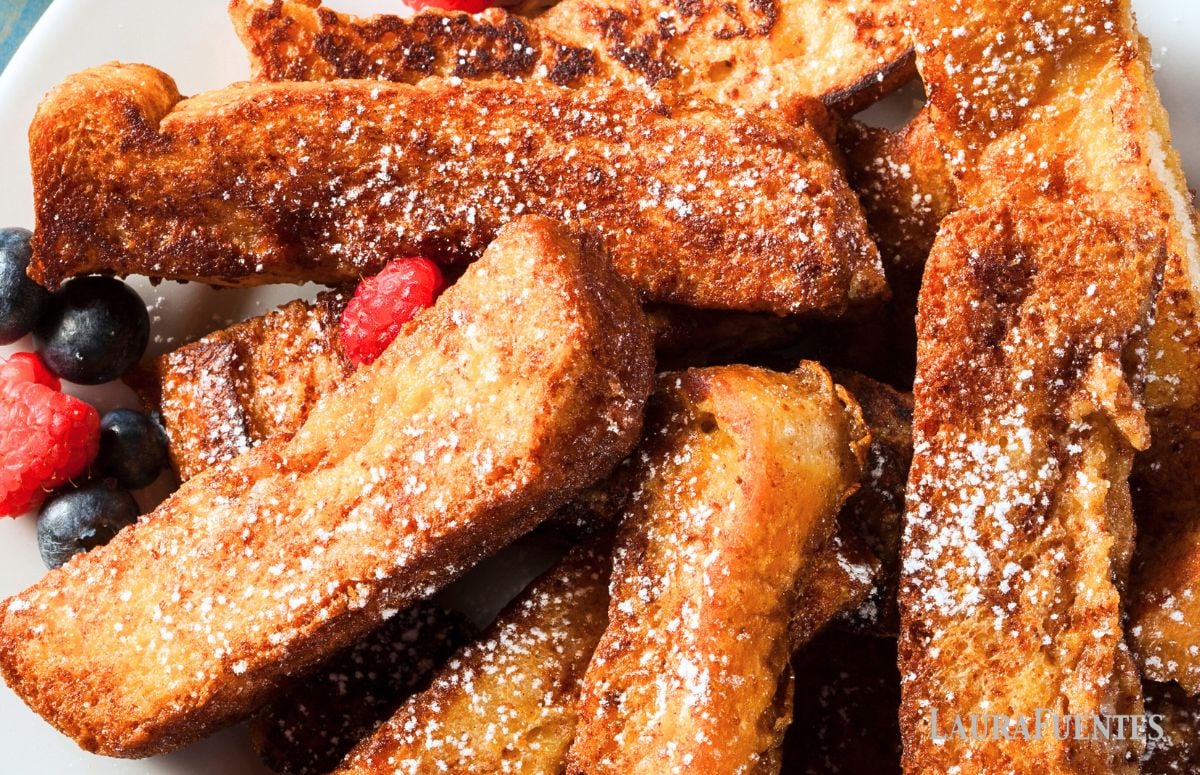
- Simple & Sweet: A dusting of powdered sugar (confectioners' sugar) is always elegant.
- Fresh Fruit: Sliced bananas, fresh berries (strawberries, blueberries, raspberries), or a medley of seasonal fruits.
- Crunch & Texture: Chopped nuts (pecans, walnuts, almonds), toasted coconut flakes, or a sprinkle of mini chocolate chips.
- Indulgent Extras: A swirl of whipped cream, a drizzle of caramel, or even a few sprinkles for a celebratory touch.
For a complete and satisfying brunch, pair your french toast sticks with a side of crispy bacon or savory sausage, a bowl of fresh fruit, and a refreshing glass of juice or milk.
Make-Ahead & Troubleshooting Tips for Perfect French Toast Sticks
Life is busy, but that doesn't mean you have to compromise on a delicious homemade breakfast. These make-ahead and troubleshooting tips will ensure your **french toast sticks** are always a success.
Mastering the Make-Ahead:
One of the greatest joys of this recipe is its adaptability for make-ahead preparation, perfect for those bustling weekday mornings or when you're hosting a leisurely weekend brunch. If you're planning a special brunch or just want to streamline your morning routine, explore more strategies in our
Family's Favorite Baked French Toast Sticks: Make-Ahead Brunch guide.
- Overnight Batter: Prepare the custard batter the night before. Whisk all ingredients, cover tightly, and refrigerate. In the morning, give it a quick whisk to recombine.
- Pre-Sliced Bread: Slice your bread into sticks the evening prior and store them back in their bag or an airtight container at room temperature. This saves valuable time in the morning.
- Bake and Freeze: You can bake the French toast sticks completely, let them cool, and then flash freeze them on a baking sheet before transferring them to a freezer-safe bag or container. Reheat them directly from frozen in a preheated oven (around 350°F/175°C) or a toaster oven until warmed through and crispy. This is a fantastic option for grab-and-go breakfasts throughout the week.
Troubleshooting Soggy French Toast:
Nobody wants soggy French toast. If you've ever encountered this unfortunate texture, here are some common culprits and how to avoid them:
- Thin Bread: As mentioned, regular sandwich bread is too thin and will quickly become saturated and mushy. Always opt for thick-cut varieties.
- Over-Soaking: Even with thick bread, prolonged soaking can lead to sogginess. A quick dip and flip is often all that's needed – just enough for the bread to absorb some batter, but not become saturated.
- Too Much Milk in Batter: While milk provides creaminess, an excessively thin batter can make the bread waterlogged. Ensure your egg-to-milk ratio is balanced.
- Oven Temperature Too Low: If the oven isn't hot enough, the sticks will steam rather than crisp. Ensure your oven is fully preheated to the recommended temperature.
- Overcrowding the Baking Sheet: Placing too many sticks on a single baking sheet prevents proper air circulation, leading to steaming instead of browning and crisping. Give them space to breathe!
With these tips, you're well on your way to French toast stick perfection every single time.
The Ultimate Easy Breakfast Awaits!
Crispy oven-baked french toast sticks are more than just a recipe; they’re an invitation to simplify your mornings without sacrificing deliciousness. With their golden crunch, fluffy interior, and endless possibilities for dipping and topping, they cater to every palate and occasion. From quick weekday breakfasts to leisurely weekend brunches, these convenient, mess-free, and utterly irresistible treats are sure to become a cherished part of your culinary repertoire. So gather your ingredients, preheat your oven, and get ready to create a breakfast experience that’s as easy to make as it is delightful to devour. Enjoy every crispy, sweet bite!